Alerts
Some providers generate alerts. An alert is a notification about a customer that highlights something you should be aware of. Alerts can be generated during the onboarding process, or they can be generated during ongoing monitoring if you have configured a provider to monitor customers in an ongoing manner.
- ComPilot AML and the ComplyAdvantage provider, can generate AML alerts.
- ComPilot KYC can generate duplicate alerts. A duplicate alert is generated when the KYC process detects that the customer being onboarded may already exist. For more information, see Duplicate alerts.
If the alert generated by AML screening confirms that the customer is a PEP, sanctioned individual, or has adverse media, and you reject the customer, ComPilot advises that you do not reveal the reason for the rejection to the customer, but instead say that you cannot onboard them for regulatory reasons.
A summary of the alerts for your customers is displayed on the Alerts page in the dashboard. Alerts for an individual customer are displayed on the alerts tab of the customer detail page.
Alerts can have the following properties.
| Property | Values |
|---|---|
| Severity | High, Medium, Low |
| Category | Onboarding, Ongoing monitoring |
| Type | For onboarding alerts: Sanctions screening, PEP screening, Adverse media screening, IP screening, Email screening, KYC drop-off, Duplicate. For ongoing monitoring alerts: Onchain monitoring, Fraud, Transaction monitoring |
| Status | Open, Under investigation, Pending, Closed, Escalated |
| Name | Name of the alert |
| Description | More detail about the alert |
| Customer | The customer that this alert relates to |
| Assigned to | The officer that this alert has been assigned to |
| Created at | Date of creation |
| Last updated at | Date of last update |
Even a single Low risk alert will mean the customer is given a status of To be reviewed.
High risk alerts include:
- Alerts where a hit for sanctions was triggered
- Alerts where a hit for PEP was triggered
- Alerts where two or more of sanctions, adverse media, and PEP were triggered
Medium risk alerts include any alert where adverse media is triggered and the media allegations are extremely serious and related to financial crime, such as money-laundering, bribery, corruption, or any other type of financial crime.
Low risk alerts include any alert with adverse media where the allegations are not related to any type of financial crime.
For more information, see ComPilot AML and ComplyAdvantage.
If the alert generated by AML screening confirms that the customer is a PEP, sanctioned individual, or has adverse media, and you reject the customer, ComPilot advises that you do not reveal the reason for the rejection to the customer, but instead say that you cannot onboard them for regulatory reasons.
An alert can also have notes associated with it, and an activity log that tracks all changes to the alert.
An alert is flagged if it is overdue by more than 14 days, and if it is overdue by more than 30 days. It can also be flagged if it has not been opened.
If a user changes an alert, it is assigned to them.
Alerts page
The Alerts page displays some metrics about alerts, and an alerts table. You can toggle between Onboarding and Ongoing monitoring alerts.
Customers are either individuals or companies. You can switch between alerts the different customer types by clicking on the All alerts, Individuals, and Companies buttons at the top of the page.
![]()
The metrics are displayed in a series of widgets and are described below.
You can change the time period by using the time period filter ![]() and you can change which widgets are displayed by clicking the Customize button
and you can change which widgets are displayed by clicking the Customize button ![]() . Each user in your organization can have their own customizations, and the customizations persist even after you log out. This means every user in your organization can customise the dashboard according to their own needs.
. Each user in your organization can have their own customizations, and the customizations persist even after you log out. This means every user in your organization can customise the dashboard according to their own needs.
By default the table displays open alerts, sorted by severity and age, with the newest alerts first. You can assign an alert to an officer by clicking on Unassigned in the Assigned to column and selecting an officer. You can also change the assignment by clicking on the officer's ID in that column.
You can filter the alerts in the list by clicking the + Filter button, and search for alerts using the search field. You can customise which fields are displayed by clicking the Customise button at the top right of the list.
Filters and searches are persistent, and remain in place until cleared or you log out.
You can delete an alert by selecting the checkbox to the left of the alert and clicking the Delete alerts button at the bottom of the list.
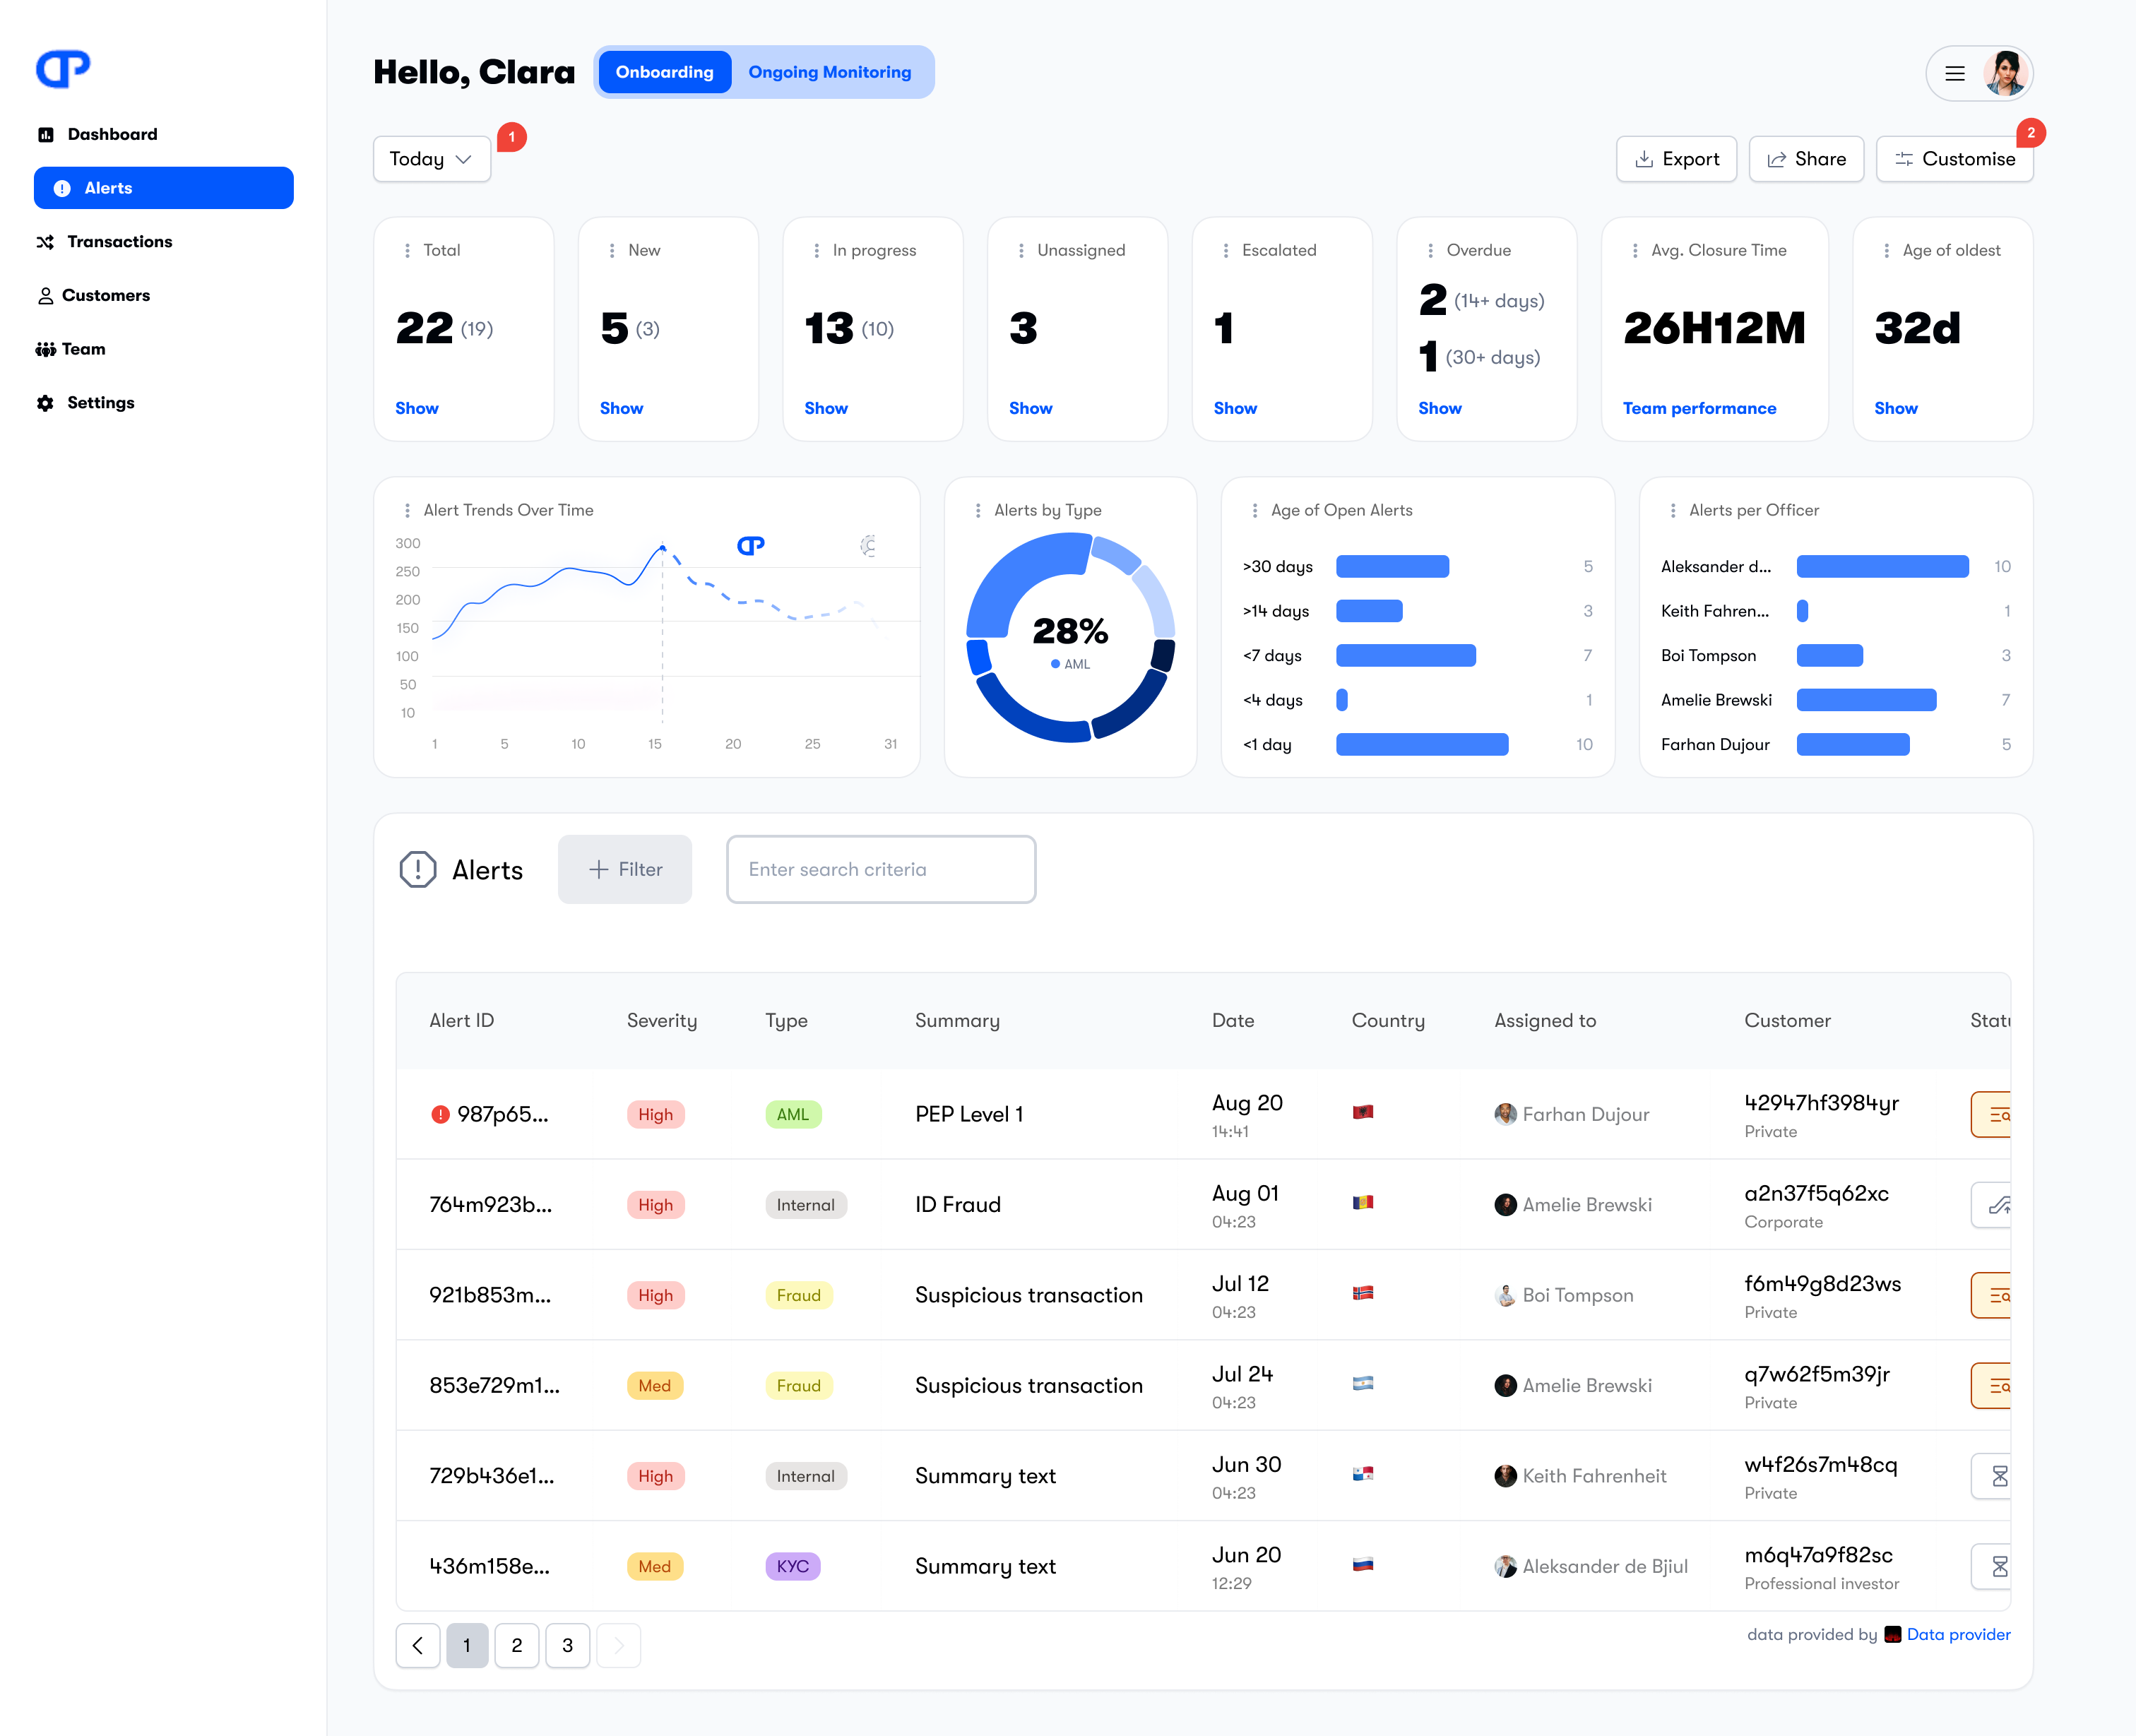
Metrics
The metrics widgets display a range of information that help you to track the status of alerts and help you manage them. The alerts are described in the following table.
Some metrics only display data for the selected time period. Others display data for all time.
If a widget displays a small number in brackets after the large number, the small number applies to the previous time period. For example if your time period is set to "Week" the large number refers to data over the past seven days, and the smaller number refers to data from the seven-day period before that. The percentage change will be shown underneath.
If you have selected individuals as the customer type, the metrics will only apply to customers who are individuals. If you have selected businesses, then the metrics will only apply to customers who are businesses.
| Metric | Uses time period | Description |
|---|---|---|
| Total | Yes | Number of alerts created in the selected time period. |
| New | Yes | Number of unopened alerts created in the selected time period. When an alert is created, it is new. Once it has been opened it is no longer new. |
| Opened | Yes | Number of alerts opened in the selected time period. |
| Closed | Yes | Number of alerts closed in the selected time period. |
| In progress | Yes | Number of alerts that had their status changed to Under investigation in the selected time period. |
| Unassigned | Yes | Number of alerts created in the selected time period that are not assigned to an officer. |
| Escalated | Yes | Number of alerts that had their status changed to Escalated in the selected time period. |
| Overdue | No | Number of alerts that are overdue (unopened) by 14 to 30 days, and the number of alerts that are more than 30 days overdue. |
| Age of the oldest alert | No | Age of the oldest alert. |
| Alerts by type | No | Pie chart that shows the number of alerts by type. |
| Alerts severity | No | Speedometer chart that shows the number of alerts by severity. |
| Age of open alerts | No | Bar chart showing the number of alerts with a status of Open, broken down by age. |
| Alerts per officer | No | Bar chart showing the number of alerts assigned to each officer. |
Alert detail
Clicking an alert in the alert table displays a page for that alert.
The header for the alert contains the following information:
- Alert name
- Alert ID
- Severity
- Type
- Assignment status (editable)
- Current status
You can change the assignment status by clicking on Unassigned in the assignment field and selecting an officer. You can also change the assignment by clicking on the officer's ID in that field.
Other information about the alert is grouped into tabs.
- The Summary tab displays a description of the alert and a customer profile summary.
- The Activity tab displays the activity log for the alert.
- The Notes tab displays the notes for this alert, and allows you to create new notes.
Duplicate alerts
Duplicates are detected by comparing information such as name, date of birth, provided documentation, and selfies. If a duplicate is detected in your workspace, an alert is generated. The alert contains the duplicate user and the original user. Clicking on the alert displays the detail page.
On the detail page, you have two options.
- Delete the duplicate customer
- Approve the duplicate (if it is a false positive)
Duplicate detection can be turned on and off within workflows
Customer detail page
The Alerts tab in the customer detail page lists all the alerts for that customer. For more information, see Alerts.
Alerts are grouped according to their status. Alerts can be edited, can have their statuses changed, and can be assigned to an officer.