Signature-based gating
To gate smart contracts with signatures using ComPilot, you have to follow these steps.
- Verify the identities of your customers using ComPilot KYC.
- Update your smart contracts to connect them to
TxAuthDataVerifier. - Update your front end to use the signature.
This document describes how to perform steps 2 and 3.
In the smart contract
Integration
In the smart contract, you need to:
- Install
@nexeraid/sig-gating-contracts, usingpnpm,npmoryarn. - Import the
@nexeraid/sig-gating-contractspackage. - Specify the address of the ComPilot signer manager.
- Add the
TxAuthDataVerifierdependency. - Use the
requireTxDataAuthmodifier in the smart contract. - If you want to be able to change the signer, use internal
_setSignerfunction with you desired access control
The signer manager is a smart contract that ComPilot uses to manage the signer address used in the ComPilot API. The signer address is the address that signs transaction authorizations in the ComPilot back end.
By using the signer manager, if the signer address is ever compromised, ComPilot can update the address without every customer having to call _setSigner. ComPilot recommends that you use the signer manager rather than the signer itself.
The signer manager address is 0x29A75f22AC9A7303Abb86ce521Bb44C4C69028A0.
This addresses is used for all the chains listed below.
ComPilot contracts are compatible with the ERC2771 Meta Transaction standard.
Example
This example illustrates how to modify an NFT minting process so that it uses ComPilot's smart contract gating. The function mintNFTGated returns the ID of the newly minted NFT upon successful verification and minting.
In this example:
signerAddressis the address of the signer manager.recipientis the address to which the NFT will be minted.
You can see an example of this in ExampleGatedNFTMinter.sol.
import "@nexeraid/sig-gating-contracts/contracts/sigVerifiers/TxAuthDataVerifier.sol";

contract ExampleGatedNFTMinter is ERC721, TxAuthDataVerifier, Ownable {
    constructor(
        address signerAddress
    )
    ERC721("MyExampleGatedNFTMinter", "GNFT")
    TxAuthDataVerifier(signerAddress)

    /// @notice - sets a new signer address
    /// @dev - can only be called by the current owner
    /// @param _signer - the address of the new signer
    function setSigner(address _signer) public onlyOwner {
       _setSigner(_signer);
    }

    // contract logic goes here

    /// @notice - mints a new NFT to a specified recipient, using a signature verification process.
    /// @dev - leverages the `requireTxDataAuth` modifier for signature verification.
    /// @param recipient - the address to which the NFT will be minted.
    /// @return - the ID of the newly minted NFT upon successful verification and minting.
    function mintNFTGated(
        address recipient,
    ) public requireTxDataAuth() returns (uint256) {
        return mintNFT(recipient);
    }
}
Upgradeable example
ComPilot also provides a contract for upgradeable contracts.
import "@unblokttechnology/nexera-id-contracts/contracts/sigVerifiers/TxAuthDataVerifierUpgradeable.sol";

contract ExampleGatedNFTMinterUpgradeable is ERC721, TxAuthDataVerifierUpgradeable, OwnableUpgradeable {
    /// @notice constructor conform OZ upgradable pattern
    constructor() {
        _disableInitializers();
    }

    /// @notice Initializes the contract by setting a name, symbol, and signer for TxAuthDataVerifierUpgradeable.
    /// @param signerAddress The address allowed to sign transaction data for minting authorization.
    function initialize(address signerAddress) public initializer {
        __ERC721_init("MyExampleGatedNFTMinterUpgradeable", "GNFTU");
        __Ownable_init();
        __TxAuthDataVerifierUpgradeable_init(signerAddress);
    }

    /// @notice Sets a new signer address
    /// @dev Can only be called by the current owner
    /// @param _signer The address of the new signer
    function setSigner(address _signer) public onlyOwner {
        _setSigner(_signer);
    }

    // contract logic goes here

    /// @notice - mints a new NFT to a specified recipient, using a signature verification process.
    /// @dev - leverages the `requireTxDataAuth` modifier for signature verification.
    /// @param recipient - the address to which the NFT will be minted.
    /// @return - the ID of the newly minted NFT upon successful verification and minting.
    function mintNFTGated(
        address recipient,
    ) public requireTxDataAuth() returns (uint256) {
        return mintNFT(recipient);
    }
}
Calling from another contract
To call a gated contract from another contract, use the requireTxDataAuthWithAddress modifier.
    function mintNFTGated(
        address recipient,
        address userAddress,
    ) public requireTxDataAuthWithAddress(userAddress) returns (uint256) {
        return mintNFT(recipient);
    }
In the front end
You can use either the ComPilot SDKs or the ComPilot API on the front end.
Using the ComPilot SDKs
If you are using the Web SDK or the React SDK, you have to get the signature and then submit the transaction to the blockchain.
In this example:
ExampleGatedNFTMinterABIis the ABI for the gated smart contract. Important: this must be the JSON not the stringified version.ExampleGatedNFTMinterAddressis the address of the gated smart contract.mintNFTGatedis the name of the function in the gated smart contract.recipientAddressis the input for themintNFTGatedfunction.
Get the signature.
- Web SDK
- React SDK
- (Deprecated) ComPilot Identity SDK
// get chain ID from client
const chainId = await client.getChainId();

// Build input object
const txAuthInput = {
  contractAbi: ExampleGatedNFTMinterABI,
  contractAddress: ExampleGatedNFTMinterAddress,
  functionName: "mintNFTGated",
  args: [recipientAddress],
  chainId,
};

// get the signature
const signatureResponse = await getTxAuthDataSignature(config, txAuthInput);
You can also add an explicit block expiration to
txAuthInput. SeegetTxAuthSignaturefor more information.const getTxAuthDataSignature = useGetTxAuthDataSignature();
const onClick = useCallback(async () => {
const txAuthInput = {
contractAbi: ExampleGatedNFTMinterABI,
contractAddress: ExampleGatedNFTMinterAddress,
functionName: "mintNFTGated",
args: [recipientAddress],
chainId,
};
const signatureResponse = await getTxAuthDataSignature(txAuthInput);
}, [getTxAuthDataSignature, chainId, recipientAddress]);You can also add an explicit block expiration to
txAuthInput. SeeuseGetTxAuthSignaturefor more information.// get chain ID from client
const chainId = await client.getChainId();
// Build input object
const txAuthInput = {
contractAbi: ExampleGatedNFTMinterABI,
contractAddress: ExampleGatedNFTMinterAddress,
functionName: "mintNFTGated",
args: [recipientAddress],
chainId,
};
// get the signature
const signatureResponse = await IDENTITY_CLIENT.getTxAuthSignature(txAuthInput);You can also add an explicit block expiration to
txAuthInput. SeegetTxAuthSignaturefor more information.The
signatureResponseobject has four properties:isAuthorized: boolean. True if this customer is authorized.blockExpiration: the block number after which the request is considered expired.payload: the block expiration and the signature concatenated together to be appended to the transaction data sent to the smart contract.signature: the signature.
Submit the transaction to the blockchain, including the block expiration and signature.
- Web SDK
- React SDK
- (Deprecated) ComPilot Identity SDK
// Mint Gated Nft with signature
   const unsignedTx = encodeFunctionData({
     abi: ExampleGatedNFTMinterABI,
     functionName: "mintNFTGated",
     args: [account.address],
   });

   // Complete data
   const txData = (unsignedTx + signatureResponse.payload) as `0x${string}`;

   // try to mint nft
   const tx = await signer.data.sendTransaction({
     to: getGatedContractAddress(EvmChainId.parse(chainId)),
     data: txData,
   });
// Mint Gated Nft with signature
const unsignedTx = encodeFunctionData({
abi: ExampleGatedNFTMinterABI,
functionName: "mintNFTGated",
args: [account.address],
});
// Complete data
const txData = (unsignedTx + signatureResponse.payload) as `0x${string}`;
// try to mint nft
const tx = await signer.data.sendTransaction({
to: getGatedContractAddress(EvmChainId.parse(chainId)),
data: txData,
});if (
signatureResponse.isAuthorized &&
signatureResponse.blockExpiration &&
signatureResponse.payload
) {
// Mint Gated Nft with signature
   const unsignedTx = encodeFunctionData({
     abi: ExampleGatedNFTMinterABI,
     functionName: "mintNFTGated",
     args: [account.address],
   });

   // Complete data
   const txData = (unsignedTx + signatureResponse.payload) as `0x${string}`;

   // try to mint nft
   const tx = await signer.data.sendTransaction({
     to: getGatedContractAddress(EvmChainId.parse(chainId)),
     data: txData,
   });
}
args is an array containing the arguments for the mintNFTGated function in the smart contract. It can contain as many elements as your function needs.
Using the API
If you are using the API, on your front end, you need to prepare the input, fetch the signature, and then use the signature. The following example uses viem.
In this example:
projectApiKeyis your ComPilot API key.ExampleGatedNFTMinterABIis the ABI for the example contract. Important: this must be the JSON not the stringified version.ExampleGatedNFTMinterAddressis the address of the deployed example contract.mintNFTGatedis the name of the function in the smart contract.
Get the workspace API client.
const workspaceClient = createIdentityApiClient({
  env: APP_ENV,
  type: "project",
  apiKey: projectApiKey,
});
Get the address and account.
const [recipientAddress] = await client.getAddresses();
const account = client.account;
Instantiate the contract.
const contract = getContract({
  address: ExampleGatedNFTMinterAddress,
  abi: ExampleGatedNFTMinterABI,
  publicClient: client,
});
Prepare the API input.
// get chain ID from client
const chainId = await client.getChainId();

// Build input object
const txAuthInput = {
  contractAbi: ExampleGatedNFTMinterABI,
  contractAddress: ExampleGatedNFTMinterAddress,
  functionName: "mintNFTGated",
  args: [recipientAddress],
  userAddress,
  chainId,
};
You can also add an explicit block expiration to
txAuthInput. SeegetTxAuthSignaturefor more information.Get the signature.
const signatureResponse = await fetch(
  `${apiHost}customer-tx-auth-signature`,
  {
    method: "POST",
    headers: {
      "Content-Type": "application/json",
      Authorization: `Bearer ${env.NEXT_PUBLIC_COMPILOT_API_KEY}`,
    },
    body: JSON.stringify(input),
  },
);
The
signatureResponseobject has three properties:isAuthorized: boolean. True if this customer is authorized.blockExpiration: the block number after which the request is considered expired.payload: the block expiration and the signature concatenated together to be appended to the transaction data sent to the smart contract.signature: the signature.
Submit the transaction to the blockchain, including the block expiration and signature.
if (
  signatureResponse.isAuthorized &&
  signatureResponse.blockExpiration &&
  signatureResponse.signature
) {
  // Mint Gated Nft with signature
  const unsignedTx = encodeFunctionData({
    abi: ExampleGatedNFTMinterABI,
    functionName: "mintNFTGated",
    args: [account.address],
  });

  // Complete data
  const txData = (unsignedTx + signatureResponse.payload) as `0x${string}`;

  // try to mint nft
  const tx = await signer.data.sendTransaction({
    to: getGatedContractAddress(EvmChainId.parse(chainId.toString())),
    data: txData,
  });
}noteargsis an array containing the arguments for themintNFTGatedfunction in the smart contract. It can contain as many elements as your function needs.
Contract allowlist
To fully secure your signature gating integration, ComPilot recommends adding your contract to your workspace's allowlist in the ComPilot Dashboard. This will ensure that only your workspace issue signatures for your contracts.
Adding a contract to your allowlist
Follow these steps to add a contract to your allowlist.
In the Dashboard menu, select Settings > Signature Gating.
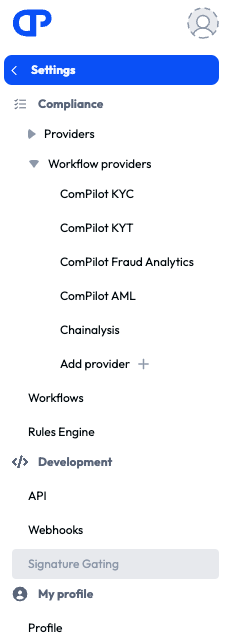
The Signature Gating page is displayed.
Click the + Add new contract button. The New contract pane is displayed on the right-hand side of the screen.
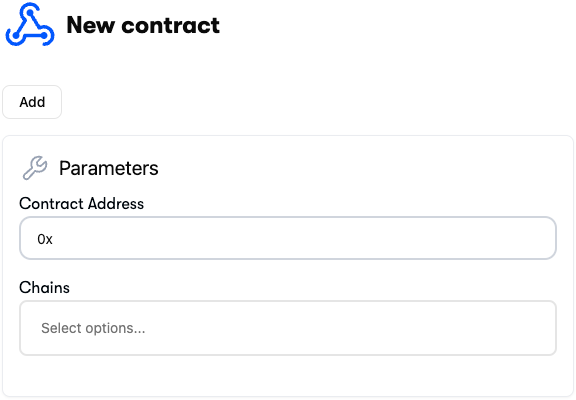
Enter the contract address in the Contract Address field.
Select the required chains in the Chains field.
Click the Add button.
Editing a contract in the allowlist
Follow these steps to edit a contract in your allowlist.
- In the Dashboard menu, select Settings > Signature Gating. The Signature Gating page is displayed.
- Click the contract address in the list of contracts. The Edit contract pane is displayed on the right-hand side of the screen.
- Update the required chains in the Chains field.
- Click the Save button. You can also delete a contract from your allowlist by clicking the Delete button.
Available blockchains
The signer manager is deployed on 0x29A75f22AC9A7303Abb86ce521Bb44C4C69028A0 on:
- Sepolia
- Polygon Amoy
- Polygon Mainnet
- Base
- Base Sepolia
- Ethereum
- Arbitrum
- Arbitrum Sepolia
- Optimism
- Optimism Sepolia
- BSC/BNB
- BNB Testnet
- Avalanche
- Avalanche Fuji
To deploy on a network that is not in this list, use 0x03DF23c4dEA7B52Daf9B7920Ec6CFeDFFA691689. This is the signer address that the signer manager is pointing to.
Contact ComPilot if you need support for another blockchain.
Smart contracts security audit
The smart contracts have been security audited by Omniscia.